This issue is a disappointment compared to the last two that I reviewed. The majority of the clothes featured are very loose and boxy and there is a lack of garments with innovating pattern drafting techniques.
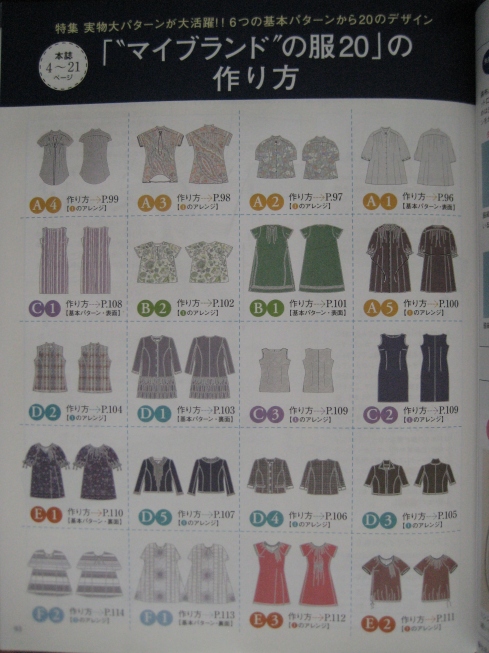
There are about 100 patterns to draft. Like the last issue, there are a lot of tunics, dresses and tops. Included in this issue are twenty ready-made patterns of tops and dresses that are variations of six drafts with elements added on or taken away.
The A Group
Two dartless button-up blouse: (Left) Shorten at the waist and sleeves. Cuff added onto the sleeves.
(Right) Hip length blouse with three-quarter length sleeves.
 Using the same dartless blouse draft: (Bottom left) Button-up dress with ruffle collar and sleeves. The front placket is decorated with trim. There is an option of adding decorative trims along the front of the dress which isn’t shown in the photo.
(Top left) One buttoned blouse with ruching above the bust.
(Right) Pullover tunic with ruching below the bust, drawstring collar and double layer sleeves.
The B Group
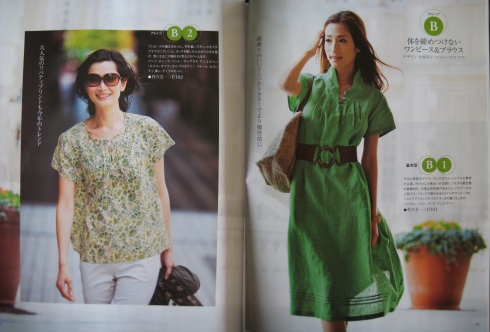 Using a tent dress draft with neckline pleats: (Left) Pullover blouse with three button enclosure on the front.
(Right) Dress with mandarin collar and pin tuck pleats decorating the hemline. There is the option of adding a tie around the waist that isn’t shown in the photo because it is belted.
The C Group
 Using the shift dress draft with a series of single darts at the waist: (Left) Fitted blouse with zipper closure at the center back.
(Middle and Right) The two dresses are exactly the same in draft, just the sewing is varied. The dress on the right has the waist darts sewn as tucks, while the middle dress has the waist darts sewn as darts.
The D Group
Using the princess line draft: (Left) Crop jacket with zipper closure.
(Middle) Sleeveless hip-length vest with ruching on the shoulder and hook and eye closures on the front.
(Right) Button up drop waist dress with three layers of ruffles.
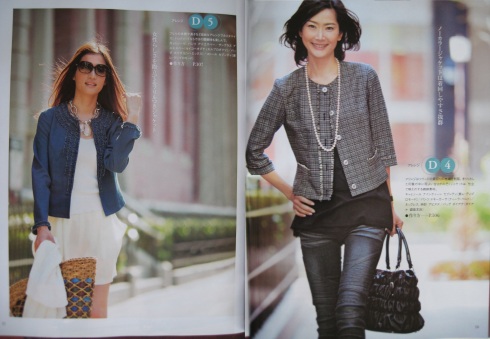 Two collarless jacket using the princess line draft: (Left) Jacket with full length sleeves. Self made ruche trims decorates the collar, the front and the sleeves of the jacket.
(Right) Jacket with three quarter length cuffed sleeves and false pockets. Decorative frayed edges are used along the sleeve cuffs, pockets and front placket.
The E Group
The base draft for this group is a variation of a blouson draft with the right side dart removed and replaced with pleats on the right side of the neckline. (Left) Short sleeve dress with gathers on the mid back and neck.
(Middle) Drawstring blouse decorated with lace trim on the collar and sleeves.
(Right) Lace tunic with gathered sleeves embellished with a bow.
The F Group
 Both the blouse and the dress is exactly the same using the kimono draft as its base with the only change being the length.
My Picks
(Left) When I first saw this vest, it looked like a generic vest. On closer inspection of the draft, it was far from generic. The vest is a patchwork of different shades of black, color blocked in such a way that it gives it a geometric look reminiscent of a Mondrian painting. It’s a shame they didn’t photograph the vest better because it looks so interesting on the draft. Another thing I love about this vest is one size fit all and no sloper to draft from since it a bunch of rectangles sewn together.
(Right Top) Three tier blouse with expose front zipper. There is an interesting detail by the zipper where two pieces of fabric is gathered and pleated to form what looks like two bows.
Exploring Fabric Types
There is a section on using different types of fabric with accompanying designs to go with it.
 (Left) Jacket with zipper closure made from embroidery lace. The neckline, waistline and center front are bound with satin bias tape.
(Right) Sheath dress with color blocking using art pique fabric and black woven fabric.
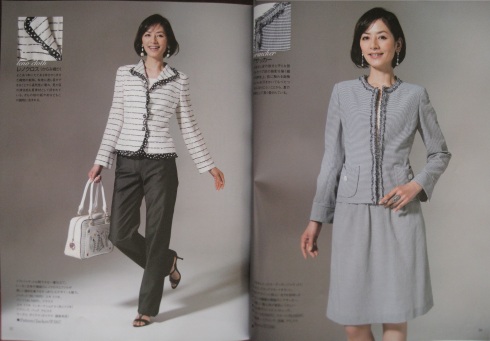 (Left) Jacket made from leno cloth with ruffles decorating the collar, front and hem. I am not liking the polka dot ruffles. It’s a bit too much with the stripes of the jacket. (Right) Jacket and skirt sewn in seersucker fabric. Fray trim decorate the neckline and front.
Matching Mother and Daughter Outfits
There is a two page spread on matching outfits for mother and daughter. No sloper required for the kid’s clothes, just follow the measurements that are given and just draft. From experience I can say drafting and sewing kid’s clothing is as simple as you get.
 Experiment with Rectangle Pattern Drafting
When I first saw these four outfits I was like …ugg. I know Mrs Stylebook likes to experiment with pattern drafting but these garments are not flattering at all. I noticed the foundation of all four designs are based on the rectangle so I googled rectangle pattern drafting and discovered it was a drafting technique used before the late Renaissance in the construction of clothing. As quoted from http://www.renaissancetailor.com, “Rectangular Construction basically takes advantage of the ‘rectangular’ nature of fabric. Most, if not all, pattern pieces are rectangular in shape, there is minimal fitting, and very few scraps left.”
This is Mrs Stylebook modern interpretation of this technique. Even though I would never make any of these garments, I appreciate their attempt to pay tribute to this ancient method of clothing construction.

 Another Baby Lock Wave Project!
Another Baby Lock Wave project that involves decorating a shirt with the wave stitch and alternating it with ruffles. The shirt draft is included along with the instruction on how to apply the wave stitch. I don’t like this look as much as the one featured in the last Mrs. Stylebook, but it shows another way of using the wave stitch as a design detail.

